I have been using Camtasia from TechSmith for a long time now for my screen-casting needs. There are many tutorials on the internet on how to upload videos on HD format but still I find people struggle to get it right.
Here is a step by step procedure to get a video uploaded in HD format –
I am re-producing the steps for Camtasia 8 but these steps should work for the lower versions as well –
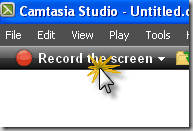
- Launch Camtasia and hit ‘Record the screen’
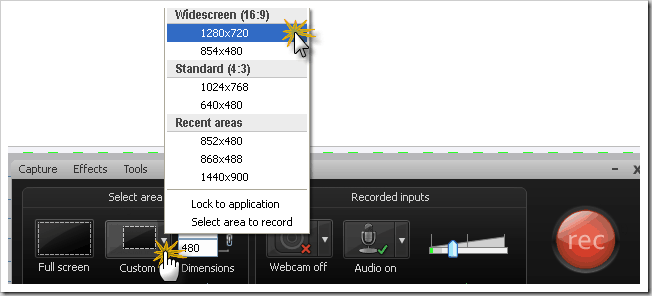
- You will get the recorder toolbar. Click on the ‘Custom’ dropdown as shown by pointing hand and select 1280*720 Widescreen(16:9) format.
- You may find that this dimension is too big for your recording needs. So here is the trick, first lock the dimensions by clicking on the small chain button. First image shows the chain icon is unlocked while the 2nd image shows it is locked.
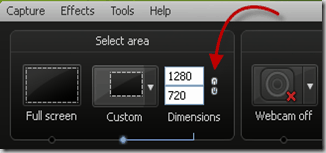
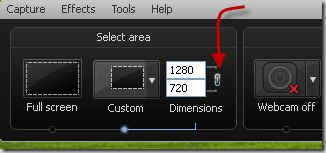
- Once the dimensions gets locked, you can move those white little squares found in your recording area as per your requirements and your aspect ratio (16:9) will remain maintained.
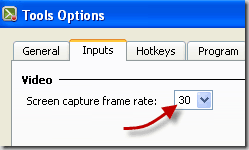
- Before you hit the rec button, please go to Tools > Options > Inputs and ensure that Screen capture frame rate is 30.
- Now you can record to your heart’s content. When prompted for editing, make sure that the editing aspect ratio remains the same as recording aspect ratio. Once recording/editing is done, we will come to the publishing part.
- On the main Camtasia tool bar, go to File > Produce and share and choose Custom Production settings. On the next screen, select ‘mp4’ radio button. You will get a dialog box as shown below.
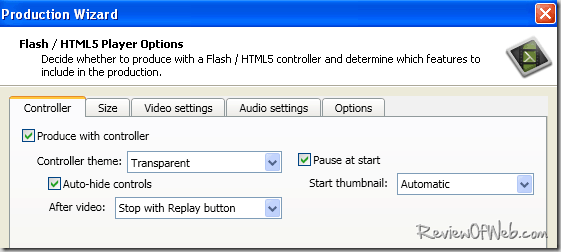
- Under Controller tab, uncheck ‘Produce with Controller’.
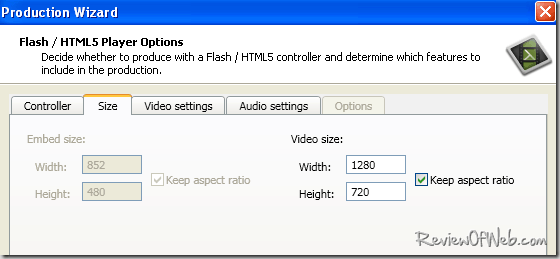
- Under Size tab, enter width as 1280. If you have followed above steps diligently, height should automatically change to 720. (Given that ‘Keep aspect ratio’ box is already checked)
- Under Controller tab, uncheck ‘Produce with Controller’.
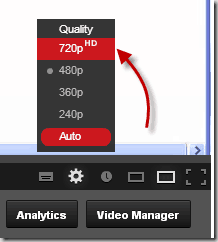
- Rest of the settings can be kept as default. Upload your video to YouTube and enjoy the High Definition clarity. As a proof, once your video is uploaded, it should show 720p HD as an option when you hit the small wrench on the YouTube toolbar.
How to embed HD YouTube videos in website/blog using iFrame method?
Normal YouTube code with iFrame would look like this –
<iframe width="468" height="263" src="http://www.youtube.com/embed/VlEfbdaadad?rel=0" frameborder="0" allowfullscreen></iframe>
To embed a video in HD using iFrame method, you need to append a parameter vq=hd720
<iframe width="468" height="263" src="http://www.youtube.com/embed/VlEfbdaadad?rel=0&vq=hd720" frameborder="0" allowfullscreen></iframe>
PS: After a lot of research online and on recommendation from the ‘audio gurus,’ I use a Blue Yeti microphone for all recording purposes. It gives excellent sound and needs zero set-up. In case you are using the same, here are some settings to note:
- Keep the knob at the cardiod level (heart shaped) for best performance (if you are recording as a single speaker.)
- Make sure that the red light at the front is not flashing, ie the light should be stable while you record audio.
- If you wish to hear the playback from Blue Yeti direct from your system’s sound card, go to Control Panel > Sound > Playback tab and make ‘Speakers’ as the default medium for playback.

 Ankur Jain is a Software Engineer in Test Automation. After a 5 years stint with Accenture and Oracle, he started his eLearning company. A long-time blogger and proud owner of the "Learn" series of websites.
yes-this works! Been trying to get my embedded youtube videos to auto play in hd in my site, and with your example, I was able to do it. Thanks!
@Mark: Glad it helped you!