Creating an email list has become a backbone for any internet based business today. You may hate the pop-ups that would flash on a website but the reality is that – and almost all webmasters would agree to it – opt-in pop ups are the fastest way to increase email subscribers.
WPSubscribers is one such promising pop-up opt-in plugin available in wordpress arena which is subject of our review today.
Installation and Activation
The plugin is available as a zip file which is around 8.5MB in size. You won’t be able to install the plugin via Upload feature present in your wordpress dashboard. You would need to upload the plugin manually to your plugins directory wp-content/plugins/via FTP. It took us around 10 mins to upload this plugin due to the size.
Once uploaded, you should install and activate the plugin. In case you have purchased unlimited license version you just need to enter the email and login id number in your wordpress dashboard but in case you have purchased a 3 website license version, you would need to additionally enter the URLs in your WPSubscribers Member’s Area.
After you activate the plugin, make sure to go to WPSubscribers under your wordpress dashboard, 1) enter your html opt-in code in the Code Detector and save the changes and 2) Go to Create Optin Forms and hit Save Changes. These are some important steps. If you just activate the plugin thinking that you may come later to add the opt-in code, you may find that your theme look-and-feel has gone for a toss!
Setting and Configuration
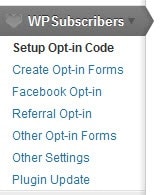
As soon as you activate the plugin, WPSubscribers settings widget can be seen in your wordpress dashboard. WPSuscribers provides a host of options when it comes to setting up an opt-in code or creating an opt-in form. I suggest you to go through the extensive tutorials on WP subscribers website.

Setup Opt-in Code
Under Setup Opt-in code –> Code Detector, you can put code from any of the email providers out there – be it Aweber, Feedburner email, Mailchimp etc. WPSubscribers will extract the form action URL, name, email and hidden fields for you, so that you need not squint your eyes digging the huge opt-in code provided by these email list providers. We added the email code that feedburner provides and within a jiffy this tool extracted the ‘form action URL’ and various ‘hidden fields’. You can add multiple opt-in codes and each opt-in code will have an id associated with it. The first opt-in will have an id of 0 and this will increase as you add more codes.
By default it provides name field and email field. You can however customize this to your liking and put additional fields to your opt-in form.
Create Opt-in Forms
Under this section, you can create different types of pop-ups or opt-in forms depending upon your requirement.
There are 3 types of opt-in pop-ups available –
- Generic Opt-in Popup
- Exit Popup: Those annoying Javascript pop-ups you see on some websites – one that won’t allow you to leave unless you take some action. A BIG no for me.
- HTML Exit popup: Similar to Exit popup but it supports HTML, images and videos too.
If you don’t like pop-ups at all, you can create simple opt-in forms that can be placed on various parts of your blog. You can create 4 types of forms –
- Post Opt-in form: Opt-in form that can be placed on top/bottom of your posts.
- Footer Opt-in form: Opt-in form that can be placed on the footer of your blog.
- Header Opt-in form: Opt-in form that can be placed on the top of your blog.
- Custom Opt-in form: A custom opt-in form that can be placed anywhere depending upon your requirement.
For this demo, we will create an opt-in popup.
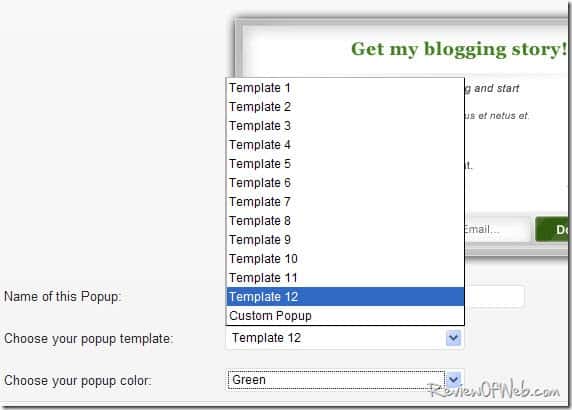
Under “Create Opt-in forms” as shown in the image above, go to Create Opt-in popup tab. Enable the Opt-in pop up by ticking the checkbox. Click on Create New Popup. On this step you can choose your pop-up design from 12 good looking templates. You can also choose the color of popup forms. There are 8 colors available.

If you’re still not satisfied you can select a Custom pop-up style where you can include your own images and videos. Full marks to WPSubscribers in this area.
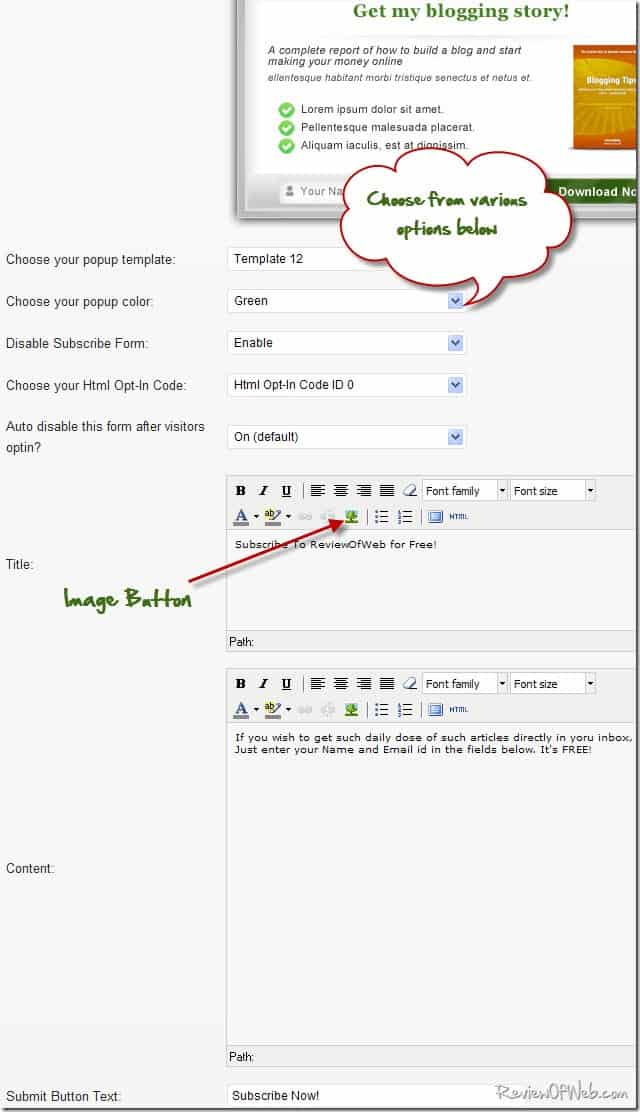
Now hit ‘Save Changes’ to edit the template for your liking. We would like to see a couple of improvements here. There should be a method to change the height and width of templates without writing our own CSS. Also, we should be able to see the preview within the wordpress dashboard itself.

As they say Beauty is in the details, the team at WPSubscribers has left no stone un-turned to make your form look good. If you click on the image button shown above, you will get various setting to customize the image present in the opt-in form. You can even choose to put different images for ‘mouse over’ and ‘mouse out’ actions.
Hit ‘Save Changes’ and proceed to Configure Display location for the opt-in. Display location is completely customizable where you can choose to display/ not display the pop-up based on category/pages/archives/search pages.

If you have created multiple pop-ups and all are enabled, they will be rotated. Nice thought!
WPSubscribers may want to have radio buttons instead of check boxes here. it won’t make much sense (unless I am missing something!) if we check the boxes for both ‘display pop-up’ and ‘don’t display pop-up’.
They have also provided Opt-in Analytics where you can view number of times when the opt-in appeared and number of times when it was submitted.
Facebook Opt-in
Facebook has more than 800 million active users. It makes complete sense to integrate Facebook in your opt-in form. Check this tutorial to integrate Facebook. Among others, you have various settings to redirect a user to another URL after login or post a message to user’s wall.
Referral Opt-in
With referral opt-in you can provide incentives to your readers for referring their friends. It’s like an affiliate system built within a popup-form.
Other Opt-in forms
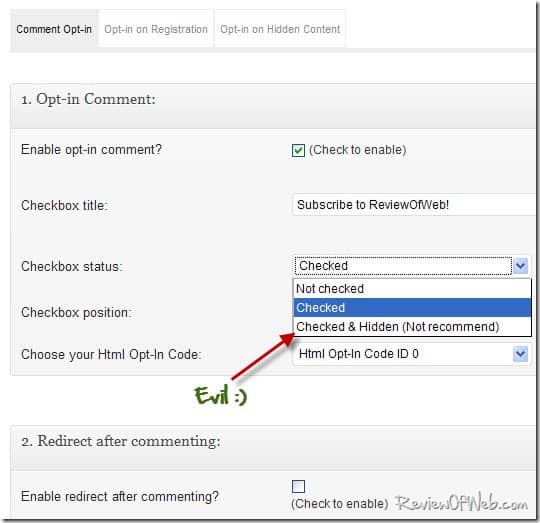
You can make your readers automatically opt-in using various forms present under this heading. An opt-in form can be placed below the comment box and can even be hidden-and-checked to force user to opt-in to your list.
You can also force your readers to opt-in by enabling opt-in on hidden content. The idea is simple. You would hide a piece of content from normal visitors and would instead have a piece of text like “Subscribe to view this content”. If they want to view that piece they should subscribe to your list.
Other Settings
This is important if you are going for pop-ups. Once you have set up your pop-up form, make sure to visit this section and customize pop-up timing to your liking. I personally I don’t like a pop-up as soon as I visit the site. I have configured ReviewOfWeb’s pop-up to appear at 5000ms (5th second after the page loads).
I am sure you have seen the demo on this blog when you visited this post. (In case you’re reading this article in an RSS feed/email make sure to visit the home page to see this plugin in action)
Final Thoughts
An excellent opt-in plugin with mindboggling options. I like the fact that author has put considerable thought and explored the needs of webmasters while designing this plugin. I am yet to see a plugin that will provide you such a vast variety of options and customizations, yet it remains easy for a new user. In case you don’t like the pop-ups, you can always use this plugin to place opt-in form on different places on your blog without annoying the reader.
As of writing this article the plugin costs $47 for 3 sites license and $97 for unlimited sites license. You can buy it here!

 Ankur Jain is a Software Engineer in Test Automation. After a 5 years stint with Accenture and Oracle, he started his eLearning company. A long-time blogger and proud owner of the "Learn" series of websites.
Hi Ankur,
I just wanted to thank you for stepping through the setup with the wp-subscribers plugin. Your review has been helpful for me in getting started with the plugin options.
Thanks again, Mark
Thanks. Good to know it helped you!